How To Test A Car Battery With A Multimeter [ 5 Easy-To-Follow Guides]
It can be quite frustrating when your car won’t start for some reason. This situation can be caused by a lot of factors, including faulty alternators and car starters. But most of the time, the culprit is the car battery. A lot of car owners would check the car battery first if they encounter ignition problems.
In this article, we will be discussing 5 extremely easy-to-follow steps on how to test a car battery with a multimeter. However, if you do not have a multimeter, we also provide other methods on the checking. Do follow through this article until the end to master these steps and you are no longer bothered with dead battery anymore.
The Importance of Checking Your Car Battery
Car batteries are essential in starting your vehicle. If it fails, you won’t be able to start the car and other electrical components. Most drivers will only conduct a car battery voltage test if the battery starts showing signs of wear out. However, the best practice is to test your battery regularly. You should get your battery tested at least twice per year to reduce the chance of failure.
There are different methods of load-testing a car battery. The most famous technique used is checking the battery with multimeter. The digital multimeter can be easily bought online or from nearby automobile shop. If you don’t have a multimeter at home, there are also other methods to load test a car battery using other tools.
You can run a visual inspection of the battery case and cables to diagnose possible problems in the battery. A strong vibration caused by a minor accident or reckless driving can also damage the battery case. Even if the battery is brand new, if the case is broken, it can prevent the battery from working properly. Eventually, the damage will render the battery useless.
If you find some swelling in the battery that could mean the battery is overcharged and the acid inside has turned into gas. When this happens, you should also check your charging system.
Steps in Checking the Car Battery with a Multimeter
1. Check for Corrosion and Dirt
Before load-testing, the first thing you’ll have to do is to locate the car battery. Car batteries are likely located under the engine compartment or somewhere in the trunk. Check both the negative and positive terminals for corrosion. This greenish-yellow buildup can interfere with the multimeter readings.
You can quickly fix this problem by using a piece of sandpaper to clean the corrosion. Clean the terminals until it’s all good and build-up-free. You should also clean the insides of the battery terminal cables to have a more accurate reading. Remember to use gloves because getting the corrosion buildup or the car battery acid on the skin is troublesome.
2. Prepare the Multimeter
Using a multimeter may be a little daunting for people who haven’t used the tool before. However, the multimeter is easy to use and one of the cheapest tools for checking your battery load.
First, you need to set your multimeter to Ohms and set it to 15 volts or above. Most multimeters support 20 volts, which is usually the nearest in 15 volts.
Before using the multimeter, you need to turn the headlights for two minutes. Doing this will remove any surface charge from the battery. Turn off the headlights after two minutes then proceed to use the multimeter.
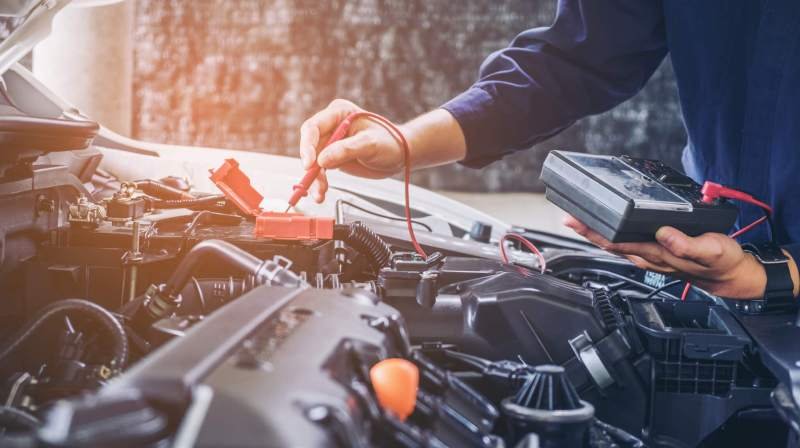
3. Touch the Battery Terminal with the Right Meter Probe

To use the multimeter, you need to touch the probe to the right terminal. The red probe is for the positive terminal, which is usually covered with a red cap or is marked with the symbol “+”. Put the black probe on the negative terminal, which is generally labeled with “-” or covered by a black protecting cap.
The digital screen should be showing a positive number (e.g., 12.6). If there’s a negative sign in the reading (e.g., 12.6), you placed the probes in the wrong terminals.
If the multimeter screen reading is around 12.6 V, then the battery is in good condition. When it goes down 12.2 V, the battery is 50% charged and lower than that, the battery is discharged. This reading is the resting voltage. To properly gauge the charge of the battery, you need to test for the Cold Cranking Amps or the CCA.
4. Provide a Light Load to the Battery
To check for the Cold Cranking Amps of the battery, you should provide a light load while the probes are attached. This is achieved by only starting the car and observe the reading changes. It’s preferable to have an assistant who will start the car for you so that you can view the changes yourself.
5. Analyze the Result
After starting the car, the reading should drop momentarily but will start rising again. Usually, the reading would go for up to 14V, and this is because the alternator is charging the battery. After that, you should turn off the vehicle and wait for the reading changes.
If the reading dropped down to 10V or more after you turned off your car, the battery is still good. However, if the reading goes down below 10V, the battery might be showing a sign of wear off and will likely go bad soon. If the reading is below 5V, then you should consider getting a battery replacement.
Ways to Check Battery Without a Multimeter?
A Multimeter is a great tool to have if you own a car. It can also be used to check the alternator, which is the component that keeps the battery charged. If you don’t have a Multimeter at home, depending on your circumstances, you may use one of the methods listed below.
Via Hydrometer

The hydrometer test, or also called the electrolyte gravity test, is another way to perform a load test in a car battery. A hydrometer with a built-in thermometer is preferred in load-testing.
Use acid-resistant gloves before conducting this test. Also, make sure that you don’t use a metal thermometer, as it can cause an explosion.
First, you need to remove the cover on the top of the battery. Carefully submerge the hydrometer needle in the first cell and take note of the reading. Do this to all the battery cells and compare the result to the manufacturer’s electrolyte specific gravity. This can be found in the package.
If the reading is between 1.265 and 1.299, the battery is charged. If the reading falls below 1.265, the battery is undercharged. If the reading is between 1.155 and 1.120, then you will have to replace the battery.
Via Battery Health Indicator
Majority of new batteries have a pre-installed battery health care indicator. This is usually the round glass cover that can be seen in one of the corners.
If the indicator shows a green color, the battery is in good condition. If the battery health indicator is showing a red, the battery is low on power. If the battery color is already transparent, or there is no color at all, the battery is already dead, and you should replace it with a newer battery.
This method is not applicable if you have an older battery.
Via Power Probe

Power Probe testing is an easier way to load-test a car battery. Some drivers prefer this because of the ease of usage.
First, you need to make sure that the car battery is fully charged. This step can take up to half a day or more if you choose slow charge. After the charging step, connect it back and turn on the headlights for two minutes. This will get rid of the surface charge. After two minutes, turn off the headlights.
Connect the Power Probe terminal to the positive terminal and take note of the voltage. If you have a Power Probe hook, connect the hook to the battery and take note of the reading. If the reading is at 12.6 V or above at 80°F after charge, the battery is still good. If the reading is below 12.4 V at 80°F, consider changing your battery.
Via Checking the Performance of Electrical Components
At present, if you don’t have any diagnostic tools, checking the performance of your electrical components is the best way to go. One way to do this is by starting your car and turning the headlights on.
You should then rev up the engine and observe the lights. If the lights become dimmer, then the battery is not charged or is low in power. A brighter light when revved up means that the alternator might have any problem. The alternator might not be able to produce enough current to keep the battery charged. If the light does not change after revving up the engine, your battery is likely doing good.
Via Dashboard Battery Light

In recent car models, the car dashboard would provide information about your car battery. If you insert your key in the ignition and turn the battery in the run position, you should see a battery sign in the car dashboard.
Start the car and observe the battery light indicator. If the battery symbol disappeared after the engine was started, your battery is still in good condition.
Check Out Other Types of Car Batteries
Car Battery vs. Alternator vs. Car Starter
All the tests mentioned above indicate the working of a battery. However, your car and other electrical components are still not working properly. In this case, you might need to test your alternator. A car battery might be in good health, but if the alternator is faulty, it will not charge the battery correctly.
If your alternator leaves a growling sound after it goes out, there is a great possibility that it is already bad. Another sign is when your car engine dies out after being started. The alternator will also give a burning rubber odor if it is overheating.
How to Test the Alternator When the Car Doesn’t Start?
You can once again use the multimeter for this purpose. You need to run the engine to test the battery. Take extra caution and be mindful about the moving parts to avoid accidents. Set the multimeter to 20DC Volts. Attach the red probe to the red terminal and the black probe to the black terminal. Start the engine and observe the reading while the engine is running.
The reading should be between 14.2V and 14.7V. If the number is over 14.7V, the alternator is overcharging the battery. This is a bad case because overcharging can damage the battery itself. However, if the reading is below 14.2V, your battery is undercharged, and you might get a problem when you’re using accessories and headlights. To further test your alternator, turn on the electrical components of the car like the headlights, radio, or the computer. The reading should not drop significantly or below 12.7V.
If the car battery and alternator are both working fine, then the problem is likely in the car starter itself. This part receives the electricity from the battery to start the engine. A clicking sound when you turn the key is a sign of a faulty car starter. In this case, you might need to call for professional help to fix the problems of your car.
Final Thought On How To Test A Car Battery With A Multimeter
Car batteries have an average lifespan of three to five years. Only a fraction of this number able to meet four years. The typical warranty coverage of car batteries is also around four years. To know if the car battery is already at the end of its life, regular testing should be done for at least twice a year.
A multimeter is an excellent diagnostic tool which helps in measuring the voltage of the car battery. This tool is a must in every car owner’s toolbox. It can test both the alternator and the battery for problems, making car diagnostics a lot easier.
Modern batteries have indicators, which is useful to test car battery capacity when there are no tools available. Some tools, such as the voltmeter and the hydrometer, can be used to check your battery. Newer car models use battery indicators, which is very helpful for new car owners who just started learning about their cars.
We hope with our guide on how to test a car battery with a multimeter will be able to simplify the steps for you. Master these steps so you won’t be surprised by malfunctioned battery again.
Related Posts On Automotive Accessories
- Transporting Your Bicycles – Bike Racks
- Prevent Summon Tickets – Radar Detector
- Reduce Risks Of Potential Car Breaks In – Car Alarm